Want to learn how to upholster a steering wheel? Then check out this awesome step-by-step tutorial.
In 2016, Joseph Pavich, an interior design engineer for Tesla Motors and former owner of JPM Coachworks, published this how-to guide in our Auto Upholstery Forum.
“Since this has been a hot topic lately and I had a steering wheel project, I figured I’d take the time to document the steps of the build to give those that haven’t done this before a better understanding of the process,” Pavich wrote.
“Keep in mind that this might not be the best way to do things, it’s just the technique I’ve developed for myself over the years,” he added. “Other folks might do things differently or have other ideas that make their wheels come out well.”
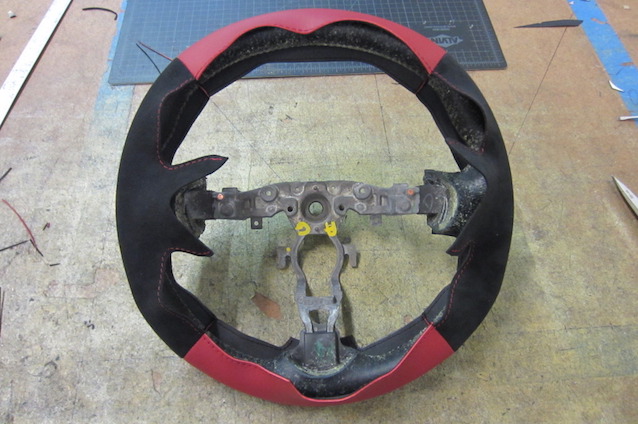
In this tutorial, Pavich upholsters the steering wheel of a Nissan 370Z. “It’s a good representation of what most modern wheels are like,” he said.
Here are his step-by-step instructions:
1. Remove and label the old cover

We start by removing the original leather cover. Be careful not to cut the leather or stretch and pull the cover as you’re taking it off.

This wheel is made up of four sections. Be sure to label where each section goes as it’s not always evident after you separate them.
2. Create your section patterns
We start by getting some chip board or thick paperboard. Something that is stiff but cuts easily. We then glue the leather sections down onto the chip board, being careful not to stretch it, but rather letting it go down naturally.
I draw a line for reference on the chip board so I am laying it down straight.
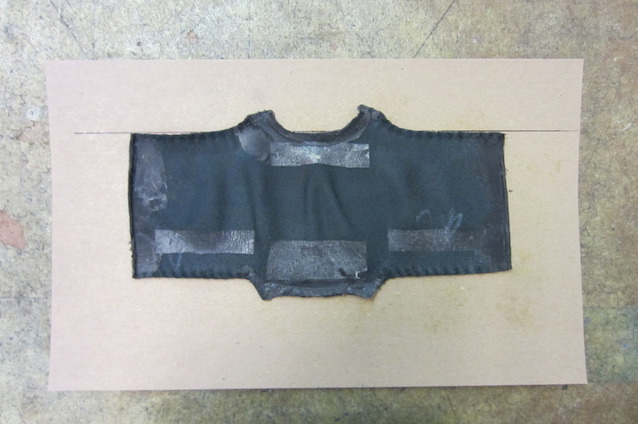
There will be bubbles in the center of the piece. This is from the leather stretching around the wheel. Don’t try to work these out or make the piece lay perfectly flat, that will just distort the pattern. The edges where the stitches are usually don’t have any stretch so those should lay flat.
After your piece is down, outline it with a pen and remove the piece.

3. Make sure it’s accurate, then cut it out
Section panels rarely have crooked or uneven edges. Keep this in mind when cutting.
If the section is symmetrical (like the top and bottom), place it on another piece of chip board and trace it again. Then, flip it from left to right and trace it again. This will cause you to have two overlapping images exposing the areas that are not symmetrical

Split the difference between the lines to even everything out and cut out your final section pattern. This will leave you with a pattern that is symmetrical and even. Repeat this step for all symmetrical sections.

The left and right sections are usually not symmetrical so a good eye and lots of practice are what make that portion of the pattern come out well. You only need one pattern for the sides as well since they are mirror images.
4. Prep the steering wheel to be covered
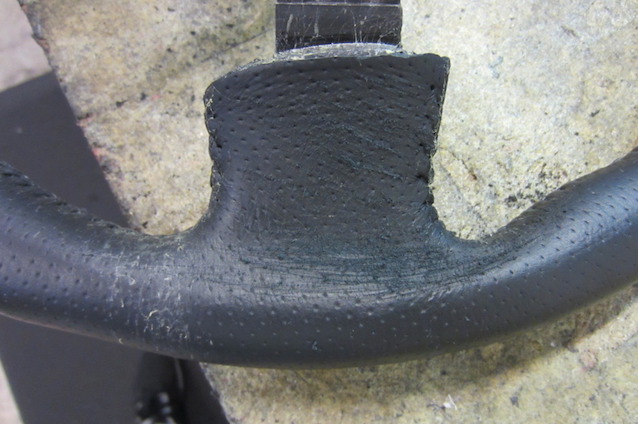
This wheel was requested to be made slightly thicker so I glued the original leather back on before covering it. The rest of the techniques are the same whether or not you’re covering over the stock leather or the stock rubber core.

If you’re covering over the stock leather, be sure to trim the material on the inside of the spokes so clearance is retained for controls and horn/airbag movement.

If your wheel has concave areas (usually along the back), be sure to sand them down a bit so the glue will grip better. I like to use a 40 grit paper to really get some bite.
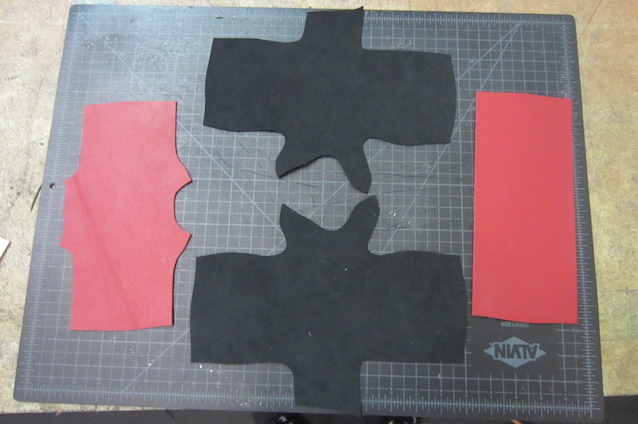
5. Cut pieces of material
For this wheel, the top and bottom will be red leather and the sides will be black Alcantara. Go ahead and cut pieces out of your material just a bit larger than your pattern.
The stretch of the material should go lengthwise around the wheel. You may have to feel around the leather hide a bit to find the direction of maximum stretch. If the stretch goes in the wrong direction, your wheel will have wrinkles.

In case you were wondering, the material shown in the following pictures all have a grey backing to them, regardless of leather or Alcantara. This is my secret sauce, if you will. This ensures me that the section panels will have consistent and even stretch and helps to eliminate wrinkles. This is by no means necessary to complete a wheel or to even have a very nice wheel. You’ll pick up your own tricks along the way.
6. Ensure the size and fit of your pattern
Start by cutting a small strip from whatever material you wish to start on first. This is the straight top section.

Next, take the strip and cut it so that it goes around the perimeter of the wheel perfectly.

Now, turn your material over and trace the sides and bottom of the pattern.

Then, take the strip you cut and measure out how wide the cut needs to be to wrap evenly around the wheel. Because this wheel is thickened, it measures about 1/2″ wider than the pattern is normally.

Finally, line up the top of your pattern to the reference marks and complete the outline trace.

Here’s a comparison with the entire outline versus the pattern piece.
You should always do this step even when the wheel is not thickened, as it ensures the section panel you’re making will wrap evenly around the wheel with no gaps or excess.

7. Cut section panels from the material
Use a straight edge and a razor when you can to ensure an accurate cut. Be sure to cut inside the line, as that’s where all the measurements were taken.

8. Check that the panels are accurate
I always test fit the cut panel by wrapping it around the wheel in its intended spot to make sure it covers the wheel properly.

9. Repeat this process for all sections
Repeat this process for the rest of the sections. By test fitting each after you cut them, you can cut away excess if needed before it’s too late.
Up to this step, every section can be fixed or redone by itself if necessary. After you start sewing, the entire wheel gets ruined if you mess up.
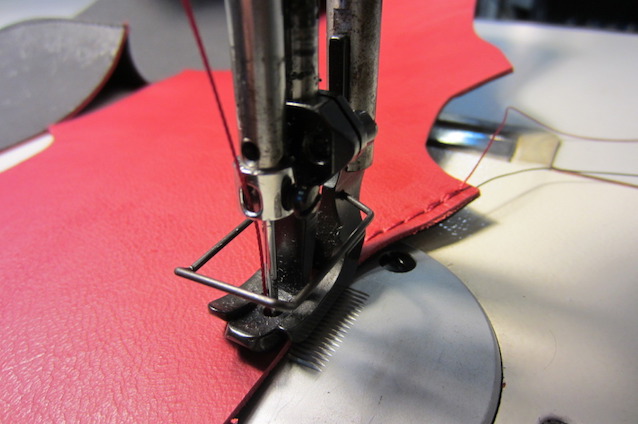
10. Sew the panels together
Begin by sewing the edges of the section panels together. I use the foot width as a guide.
Since this wheel has recesses for the seams, skiving and folding is not necessary. If the wheel did not have recesses, the leather is usually skived, although I end up cutting channels in the wheel as I feel the recess method is easier and provides a cleaner look with no chance of material showing through from underneath.

To stitch the wheel together, I use a T-92 weight thread. You need something with strength, but not too thick. It is all sewn on a relatively short stitch length as well. I back tack three stitches at the beginning and at the end of each seam, with the first and last thread overlapping the ends.
11. Angle the corners and test fit
After the sections are stitched together, angle the corners a tad so the top stitch stays even over the seam.

All of the sections together should be smaller than the actual diameter of the wheel. The key to a nice fitting wheel is a tight pattern. You can see here how much smaller the actual cover is than the wheel itself.

12. Make the perimeter stitch
Now its time to make the perimeter stitch. For this, I use a T-138 or T-207 weight top thread with T-138 bobbin thread. The bobbin has a harder time with the thicker threads so I keep that smaller. Anything less won’t have enough strength to withstand any sort of tension once you start hand sewing it.
Again, I use the foot as my spacer from the side. It ends up being about 1/8″ away from the edge.
The beginning and ends are back tacked no more than two stitches. These are usually covered up by plastic trim pieces. Some wheels require an exact starting and end point as they are visible.
Work your way around both sides of the wheel until you have put a stitch along each edge.

13. Install the cover
Now it’s time to fit the cover to the wheel for the final time. It should be a tight fit as mentioned before so that the edges of the pattern naturally want to stay inwards. This is always a balancing act between too tight and too loose. You’ll get the hang of it with practice.
Line up your seams with your recesses and make sure the wheel is on straight and the edges fall in where they are suppose to. If squeezed together, all of the edges should butt up against each other.

14. Glue the cover down
Now, take your favorite glue (I’m using DAP Weldwood HHR) and spray the inside of the spokes. The spokes are always glued or stuck on to keep them from shifting and because they’re not always held down with just tension.

Then, press the edges in making sure everything butts up properly and evenly.

15. Time to hand stitch
Now comes the fun part. You’ll need a straight blunt tip needle (sometimes called an upholstery or tapestry needle). It has to be large enough to grip comfortably but small enough that it can pass through the thread you just stitched on. Make sure it’s not a sharp pointed needle. I’ve sanded down the points on some of those in a pinch.
Take a length of thread roughly 2.5 times the length of the section you wish to sew (you’ll get a better idea of the length once you do this once or twice). Tie a lasso loop on one end and pass the other end through the needle.

Next, start stitching the bottom sections of the wheel. Begin by threading the needle through the first two stitches on the edge of the wheel and inserting it through the lasso end to create a firm knot. Then, slowly advance up the wheel going from one side to the other.
I’m a righty, so I go from right to left with the left stitch being oriented slightly higher than the right stitch. This ensures my stitches end up looking nice like little boxes or diamonds.

The top section of the wheel is a bit different as you don’t start from one side or the other, but rather the center of the wheel.
This is because it makes the longer length easier to sew and it keeps the thread from fraying as much as the more you sew, the more your thread will end up fraying in the process. A good bonded thread works best.

At the end of each section, tie your thread off on the last few stitches so that it’s not visible once the trim pieces are back on the wheel. You’ll see different techniques for this on various OEM wheels. I always burn loose thread with a lighter to keep it clean.
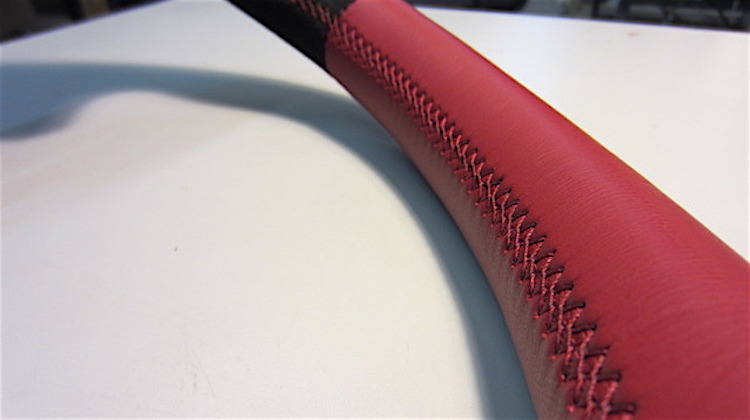
16. You’re done!
Finally, sit back and admire your work.

With practice, your stitches will come out nice and even over large lengths.
This takes time to learn, so expect your first few wheels to be a bit off until you get the hang of it. Some sections of the wheel will also require you to double stitch a section to keep the pattern looking even or if you go around a corner.

I hope this was helpful to those that have been wondering about wheels.
As mentioned earlier, this is just the way I’ve learned. There is no wrong way so always keep an eye out for what methods work and don’t work for you.
Also, always study OEM wheels as much as possible before completely taking them apart. They have invested a lot of money into wheel patterns and techniques so anything you can pick up from their hard work is a bonus.
For more tutorials, visit The Hog Ring’s “How To” section.
Awesome! What kind of sewing machine are you using?
How do you make patterns when there isn’t one to cut off?
Place masking tape on the surface and then use a sharpie to mark where you need seams or details to be. Make sure you draw the parting line then proceed to cut it off and peel back the tape. When you unfold the tape place it on a piece of card stock and that will give you a pattern. I would recommend using a piece of scrap material that has the same properties as your leather. Test it out and then mark any changes you want to make. Peel this material off and proceed to iterate like this until you are happy with the final material.
I have never wrapped a steering wheel but I have made sneakers and this is how they do it. Same principle. I could be wrong but I bet I’m close. This is how I would do it.
Invest in ATLIS Motor Vehicles.
Hi beginner here, i have run into a problem where when I peel the masking tape off the steering wheel it tends to shrink in the process of doing so. Whats a good way to deal with the shrinkage?
Warm weather
what type of leather are you using? weight species etc?
That was a very nice process. It looks OEM and very clean, I will definitely use this.
How many hours typically does it take? I feel I’m slow at them. I have only done a few wheels though.
Esto es sencillamente !ROMÁNTICO Y HERMOSO¡ gracias por compartir.
Thank you looks like something I can use in the future, I’m look forward to do this.
Wow amazing… What material is the most suitable to sew?
Can’t recommend these steering wheel clamps enough, make re-upholstering a steering wheel so much easier!
https://retroretrims.co.uk/trimshop/en/upholstery-tools/87-steeringclamp.html
Hey Kirstie, Assuming you are in the US, how much in US $ was to get one of the steering wheel clamps?
How much money should I expect to be charged to have my steering wheel reupholstered in say black leather” It’s a 1996 Saab 9000 Aero, ?
Traveling to south Florida? find the best Luxury Car Rental Miami with mph club, pick an exotic car for rent from a large inventory or luxury and exotic cars. Luxury Car Rental Miami
This looks great. Can you provide your template for download? Also, what weight of leather do you recommend?
McCoys Upholstery does at least 100 a season. You have made a accurate pictorial.
The hand stitched part only leaves out the sore fingers.
Who could do this for me and how much would they charge?
I’d love a template for this wheel you did- I also have a 370, tried to do mine myself and I must have been off in a few places because it’s not perfect. I NEED IT TO BE PERFECT lol
Dear all,
Is there any place on the web to download patterns in .pdf
I’m a beginner an need some time to learn and practice.
Thanks for supporting
What is the cost of this?